Sunday, September 26, 2010

12 week Personal Challenge

In Julie and Julia, Julie cooked her way through Julia Child's cookbook..Me? I'm going to "dessert" my way through "Top Chef- Just Desserts" elimination challenges... and if I wayyyyy out of my zone..I'll do the quickfire ones instead... 
My goal is to complete the 12 challenges by 12/31/10...so family...watch out! who knows what i'll be bringing to the holidays =].  The biggest challenge to me would be sizing the dessert right... I really don't want to make a whole cake if it is just my Dearest and I eating it... so the extra twist for me is to make the dessert RIGHT and the serving size right...  I still need to fit into a bride's maid dress next year... =]


Now I know I am a little behind since 2 episodes have already aired but oh well.. I'm not in the show =] I just want to challenge myself, and I might not be able to keep up with it- to make a weekly dessert- but I'll try.  I will not be following the time limit, get to use recipes and be adjusting things as I go- for instance: I will not be making a wedding cake (if that is the challenge) but cupcakes...sometime like that.

Also, there is a collection of food + photography blog forum called tastespotting.com.  I have been submitting my entries there but no luck- my photos aren't good enough...yet.  It is a goal of mine to make it onto that forum so I shall continue to learn how to take better photos while also completing the challenges from "Top Chef- Just Desserts." 

Wish me fun. =] 

Friday, September 24, 2010

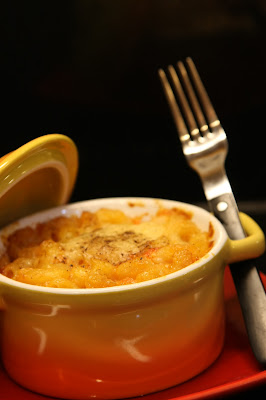
Mac & Cheese

Last weekend was wonderful! I got to hangout with friends, eat the food that I LOVE and miss, and get to visit my favorite supermarket!  Now it may sound silly that I love a supermarket- WEGMANS- so much..but I do.  When I went there, I felt..happy- everything about it is awesome.  I found some mini casserole dishes on sale and couldn't resist to get them.  I stood at the aisle for, literally, 10 minutes deciding oval or circle? green/yellow or blue/ red? should i get plates too? ... So I got them ALL! hahaha =] which is perfect because there is 4 plates (blue, red, yellow, green) and 1 of each color in the casserole dishes- 2 circle and 2 oval. 

I was super excited and couldn't stop thinking what I could make.  I decided to make Mac&Cheese with tomatoes.  The recipe was in Cook's Country and I've been wanting to make it for a while now. 

Mac&Cheese with Tomatoes (serves 4)
Salt & Pepper
1/2 lb of elbow macaroni
1 can (small can) petite diced tomatoes
3 tablespoon of unsalted butter
1/4 cup all purpose flour
pinch of cayenne pepper
2 cups half-and-half
1/2 cup chicken broth
2 cups shredded Mild Cheddar Cheese
1 cup shredded Sharp Cheddar Cheese

Preheat oven to 400degrees.  Move the rack to the middle position.

1. Cook the macaroni according to directions.  Drain the pasta and return to pot.  Pour diced tomatoes with their juice over pasta and stir to coat.  Cook over medium heat until most of the liquid is absorbed- about 5 minutes.  
2. As the pasta is cooking, melt the butter in a saucepan and stir in flour and cayenne and cook until the flour is golden.  Slowly, whisk the half-and-half and broth into the flour and whisk until it is smooth.  Bring to a boil and lower the heat to medium heat.  Cook and stir until sauce is thickened- about 15 mins.  Take the saucepan off the heat and add in the cheeses.  Salt and pepper to taste.
3. Pour sauce over the macaroni and stir to combine.
4. Scrape the macaroni and cheese into a baking dish  and bake until the top is golden brown- about 15-20 minutes.  Let sit for 15 minutes before serving or else it would be soupy.  

NOTE: To make this dish ahead of time, do steps 1-3 and put in the cooking dish.  Wrap it tightly with plastic wrap and refrigerate for up to 2 days.  When ready to be baked, cover with foil and bake for 30 minutes, remove the foil and bake for another 15 for the golden brown top.  

Sunday, September 19, 2010

A Menu for De-stressing

Being an adult is hard! Between work and making long term decisions, there is no time to rest!  Both my Dearest and I had a stressful week and on Friday, we decided it is time to take a break and enjoy each other's company.  We went out grocery shopping, cooked and enjoyed a movie.  It was a needed break from all the stress triggers. I hope you enjoy your time with your love one.

Our menu for dinner was "Tortellini with Jonesville sauce" as the entrĂ©e and "Green Tea Creme Brulee" as the dessert.  I'm calling the sauce "Jonesville Sauce" is because I had a similar dish at Jonesville Store and it inspired me to make it for my Dearest.    

I am a big fan of desserts. my Dearest..not too much... but he loves Creme Brulee.  The first Green Tea Creme Brulee we had was made by him and I LOVED IT! It was perfect.  

Usually creme brulee is baked in a water bath but I was not sure if my glasses can handle the oven so I steamed it instead.  It was easier and still had the creamy custard texture.  I'll be using this technique from now on.  You'll need a big pot/wok and a steamer.


Tortellini with "Jonesville" Sauce
Tortellini with "Jonesville" Sauce (serves 2) 

1 package of fresh Tortellini*
1/2 grilled sweet onion
1 1/2 cup sliced baby portabella mushroom
1 1/4 cup frozen corn 
2 cups heavy cream
2 tablespoons of oil
1 tablespoon flour
salt and pepper to taste
Cayenne pepper (optional) 

1. Cook the Tortellini according to the directions on the package.
2. Heat a skillet with the oil and sautee the mushrooms until it is golden brown. 
3. Add the onions and sautee for 1 minute.
4. Add the flour sautee until flour is brown 
5. Add the cream and corn and stir constantly until the sauce is thicken and creamy.  Salt, pepper, and cayenne (if using) to taste.
6. Strain the tortellini and toss it with the sauce before serving. 

* Check the serving size of the package or else you will end up with more than enough Tortellini


Green Tea Creme Brulee

Green Tea Creme Brulee ( adapted from Cook's Illustrated
(Serves 2)

1 cup heavy cream, chilled
2 tablespoons of granulated sugar
pinch of salt
1 teaspoon of Jasmine Green Tea
3 large egg yolks
2-4 teaspons of turbinado sugar or demerara sugar


1. Combine 1/2 cup cream, tea leaves, sugar, and salt in small saucepan; bring mixture to boil over medium heat, stirring occasionally to ensure that sugar dissolves.  Steep the tea for 5-10 minutes. 
2. Boil the water in the pot/wok and arrange the ramekins/cups on the steamer
3. After cream has cooled slightly, stir in remaining 1/2 cup cream to cool down mixture further. Whisk yolks in medium bowl until broken up and combined. Whisk in vanilla extract and about 1/4 cup cream mixture into yolks until loosened and combined; repeat with another 1/4 cup cream. Add remaining cream and whisk until evenly colored and thoroughly combined. Strain through fine-mesh strainer into 2-cup measuring cup or pitcher (or clean medium bowl); discard solids in strainer. Pour or ladle mixture into ramekins, dividing it evenly among them.


  1. Torching to caramelize the sugar
    4. Carefully place the steamer on the pot/wok.  Steam until centers of custards are just barely set and are no longer sloshy.  Steam for 20-25 minutes. 
    5. Remove from the pot/ wok and let it cool down to room temperature.  Cover with plastic wrap and chill in fridge for at least 3 hours (up to 4 days.)  When ready to eat, uncover and sprinkle a layer of turbinado/ demerara sugar on the top.  Carefully, ignite torch and caramelize sugar.  

    NOTES:
    If there is condensation on the top of custard, dab it dry before adding sugar to brulee.

Friday, September 17, 2010

The Good Old Days...

I was talking to one of my best friends today and he told me he moved into the dorms of his school and are eating all the "college junk."  I remember those days- grabbing whatever you can to eat in the few minutes you have.  Last semester, I survived (while my wallet did not) on buying sandwiches on campus for lunch because I didn't have the 3 minutes to microwave leftovers.

As usual, college food is nothing compared to home cooked comfort food- so when I lived in the dorms, I improvised with what I got.  I went to the dining hall and find the typical foods available and thought "how can I use these ingredients to make something better?"  and then the ideas started to fill up my stomach... Here's some ideas may fill your stomach... [Most of the ingredients can be taken from the dining hall.. ;)]

By the way... a rice cooker helps a LOT!  That and a hot water boiler was the only cooking tools I had!

1. Buffalo Chicken Sandwich - Take grilled chicken and turn it into buffalo chicken

Grab the hot sauce that is available and put 1 cup of it into a microwaveable bowl.  Add 2 tablespoons of butter into the bowl.  Add a splash of worcestershire if they have.  Throw in 1 teaspoon of sugar.  Microwave for 1 min or until the butter has melted.  Carefully!.. stir it so everything is nicely mixed, and pour it over the grilled chicken! And enjoy your buffalo chicken anyway you like it.

2. Dorm Style Stir-Fry (the rice cooker is needed..or something to the extent)- Most dining halls have a salad bar, use that to make something more than a salad..


Grab everything but the lettuces!  Grab the baby corn, peppers, mushrooms, tofu, bamboo shoots, broccoli,  carrots, celery.. etc.  whatever you like in stir-fry GRAB IT!  ..grab a little bit of oil, soy sauce/ teriyaki, hot scauce while you are at it.. =]
Plug in the rick cooker and press the "cook" button on so the pot can get hot.  Add some oil and then add in the veggies!  Stir it a little bit and add 1/4 cup of water and the sauces and put the lid on it.  The water boil and the steam will help with the cooking process.  When the veggies are cooked and soft, bon appetite!

NOTE!!! Want "chicken and broccoli"? grab grilled chicken and broccoli and cook it the same way as above! MA PO TOFU could be made this way too..it was yummy.. that way you don't have to always call for chinese take out.


3. Breakfast Sandwich - Assemble breakfast into 1 item so it is easier to eat on the run.


This is easy.. grab the english muffin/toast, sausage patty and ask the cook to fry you up an egg with cheese and just put it together yourself! not too hard...?

the best idea..? DESSERTS IN A DORM!
4. Dorm "Apple Pie"! (rice cooker or a pot(and stove) is needed)- now...i usually don't support taking the easy way out when it comes to desserts...but when you are in college...exceptions can be made. If you have time, you can go and buy a pre-baked pie shell. Or you can skip the pie shell (and save some calories) and just have apple pie a la mode!

Grab 6 apples (granny smiths are better than others..but grab whatever is available), butter, cinnamon sugar,
and cut them up into slices.  Melt the butter and mix in the apples and sugar.  Put into the rice cooker/pot and turn it on. Turning occasionally, cook for 30 mins or util the apples are nice and soft.  Now you can either pour it into the pie shell and wait for it to cool...or put the apples into a bowl and put ice cream on the top!

I have made all the above in my dorm room on a fly, so there is no set measured recipe.  Use what you have and just be creative.

This is for you, buddy.

Monday, September 13, 2010

Capturing Fall/Autumn's scent...

... in apples! Add a touch of cinnamon, nutmeg, allspice and everything nice to complete a Fall scented home. If "homey" "warm" "relaxed" "cuddly" can be a smell... that is how Fall smells to me.

My first time apple picking was when I visited my sister when she was a freshman in college.  Since, I've been going nearly every year to pick the fresh and sweet apples.  The best parts of apple picking is that you can try the apple varieties before buying!  Another is fulfilling your inner child dreams- to climb trees without being yelled at. ;) 
Homemade Soymilk
To me, the most sweet, fun and awesome moment of apple picking is when I say "Hon, I want that one!" while pointing to the highest apple ever.  I giggle, smile and laugh (and spot the ladder!) as my Dearest gives me the "Oh you..." look and climbs the ladder to get that ONEEEE apple <3 and tosses it to me.  


Of course, you can buy apples year round in the supermarkets... but what is the fun in that?  Apples in the stores have been picked at least over 2 weeks ago!  Going to an apple orchard is fun because you get to pick and enjoy apples right off the trees while also supporting the local farmers.

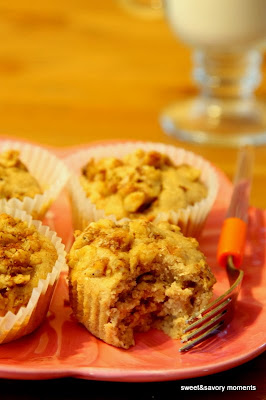
Yesterday, my sister and I were looking for something to bake to bring to work and decided to use the fresh apples and make an Apple Walnut Spiced Bread/ Muffin.  It was so moist with chunks of apples in the inside and toasted walnuts on the top.  Want to know how Fall smells like?  Try this recipe and you'll understand. Just from making the batter, your home will smell like fall.  Enjoy these sweet moments with a cup of hot homemade soymilk and enjoy life.

Apple Spiced Cake/Bread/ Muffin (adapted from Bon Appetite)
3/4 cup unsalted butter, room temperature
1 cup unsweetened Applesauce (homemade or store brought)
1 cup Apple (chopped)
1 3/4 cup All Purpose Flour
2 teaspoons of Apple Pie Spice
1 teaspoon of baking soda
1/2 teaspoon of salt
1 1/4 cups of sugar
1 large egg
2 cups toasted Walnuts (chopped)
2 tablespoon of maple syrup or honey

Pre-heat oven to 350 degrees Fahrenheit (use middle rack)
Butter and flour 2-8in dia. cake pans, 24 large muffin tins, 2-8x4 bread loaf pans

1. Whisk the flour, spices, baking soda, salt, and sugar in large mixing bowl until evenly combined.
2. In a small bowl combine the toasted walnuts and maple syrup/honey together.
2. Using electrical mixer, beat the butter and egg into the flour mixture until batter has small lumps (about 2 minutes)
3. Beat in all of the applesauce and apples and mix until batter is all moist (about 1 minute)- if it looks a bit dry, add more applesauce 1 tablespoon at a time.
4. Divide the batter evenly among the pans and sprinkle walnuts on the top.  Gently, press the walnuts into the batter so it would stay on top while baking.

Bake for 25-30 minutes, or until the tester inserted into the center comes out clean.  Cool cake in pans for 10 mins and then turn it out onto cooling racks.


Sunday, September 12, 2010

A Better Cup o' Joe

Fresh Roasted Coffee Beans
This weekend, my boyfriend and I finally took the leap and roasted our first batch of coffee beans.  We've been looking into it for a while now but never started.  This weekend I decided to surprise him with the green (unroasted) coffee beans and the equipment for roasting.  We roasted a Guatemalan Huehuetenango to espresso/ dark french.
During the roasting process, a lot of smoke is produced! It was as though something was burning!  Roasting beans are fun and tricky.... they can turn from city roast to espresso in less than a minute.

It tasted great! We usually like our coffee low on acidity, dark, nutty with chocolate tastes- all that this coffee had.  I can't wait to roast another batch.

Oh, did I mention that the beans were all organic and fair trade?  We like to support fair trade farmers- who feeds everyone's food needs.  Organic and fair trade farmers practice sustainable farming and soil conservation.  Thumbs up for those farmers!

Fresh brewed espresso
Thanks to my sisters, I recently received an espresso machine- what better way to test the fresh coffee beans!   There is nothing like a fresh latte/ cappuccino made from home roasted beans.  Plus- we get to save $3 from going to starbucks.
 Homemade Latte/ cappuccino